Video Converter for Mac FAQs
-
1. What to do when I fail to download YouTube videos?
Due to the unexpected change with YouTube website recently, our program fails to download YouTube videos at present. Please expect the upgrade with solution in two days. If you are our purchased customer, free upgrade is provided.
Also, please set the auto-check upgrade in the program so that you will be reminded in time. Start the program, choose program name from the top menu>Preferences, and select Every Day in the option Check for updates automatically.
-
2. Why doesn't my Apple TV recognize the converted file?
Click the Menu button at the bottom right corner to enter menu editing mode.
If this happens, do the following to have a try.
1. Run the product to loaded your video to the application.
2. In the format tray, go to Apple Devices and mouse over Apple TV icon.
3. Click the Settings (Gear) button, in the window that shows up,set Resolution to 720*480 and set Channel to 2 Channels stereo.
4. Convert the video and have a try.
If it doesn't work, do these: open iTunes, find the converted file and go to Advanced > Create an iPad or Apple TV version in the top menu bar. Then try again.
It the problem is still there, refer to this post that was discussed in Apple Discussion.
http://discussions.apple.com/search.jspa?threadID=&q=unsupported+format&objID=c197&dateRange=thisyear&userID=&numResults=15&rankBy=10001 -
3. How to convert DVDs made by a DVD recorder?
The file system of home-made DVDs might be different from commercial DVDs. They don't come with a standard DVD movie file system which the failure loading them to our applications. You're recommended to copy the files from home-made DVDs to your Mac's hard drive first, and then import these VOB files to our video converter application to convert them.
-
4. What to do if a WMV video doesn't play fine on Mac?
WMV is the main video format on Window platform and thus is not natively supported on Mac. To play WMV on Mac, you need to install a free tool Flip4mac. Download it here: flip4mac.uptodown.com/mac/descargar
Alternatively, use our product iSkysoft Video Converter for Mac to convert WMV to almost any format you wish.
-
5. How to rotate a video with this program?
After loading your videos into the application, you need to first open the Edit window. Two ways are available:
1) Click the Edit button on the right side of the video thumbnail
2) Click Edit > Cropping from the top menu.
In the Adjust tab, you can find buttons like
 . They are: Rotate Left, Rotate Right, Flip Horizontaly and Flip Verticaly. Just click the option you want and you'll see the result when previewing.
 -
6. How to trim a video with this program?
Launch the program, when you are done with loading the video file, open the Edit window in 3 ways:
1) Click the Edit button.
2) Click Edit > Trimming from the top menu.

Click the Add trim marker button, you can add a pair of sliders. Drag to divide the two sliders then the part between the two sliders is what you want to keep. You can also type digits in Start Time & End Time pane to define it.
This application supports multiple trimming, so you can trim several parts from one video at one time. Drag the Play slider and then click the Add trim marker button, you can add more trim sliders and customize the part you want. You can click the Reset button and remove current sliders.Tips: There are two options in the "Preference" drop down list: Keep the selected section, Delete the selected section. You can select according to your habit.
After trimming, you can click the Close button icon to save the settings.Tip: close the window, you can back to the main interface of the program to convert directly.
-
7. How to download online videos
After you select Download, you enter the interface as below.

There are three ways to download videos:
1. Open Safari( Firefox or Chrome) to browse the video you want to download. When there is a Download button on the top of the video, click it and the video will be added to the Downloading list.
 For YouTube videos, click the Download button on the top of the video, in the drop-down list, there are several options for the video resolution . You can select the larger one to download HD video.
2. Copy the URL of Video and then click Paste URL button. The video will start to be downloaded.
 3. Drag the URL of the video you are playing to iMedia Converter Deluxe icon on Dock or the interface of iMedia Converter Deluxe, and the video will start to be downloaded.
Tip: Click iMedia Converter Deluxe > Preferences on the top menu bar. In the Download tab, you can choose the output folder, the number of simultaneously downloading clips and uninstall extension.
After downloading, in Downloaded tab, you can right click the video and choose Show downloaded file to find the downloaded files on local disk. Then drag the video to Convert or Burn pane.
-
8. What to do if a VOB file is loaded incomplete?
First check whether the VOB file is a common video file or a video file from a DVD disc.
1. If it's a common video, ensure this VOB file plays flawlessly on Mac before loading to the application. If it fails, send us the VOB file for troubleshooting.
2. If the VOB file is from a DVD disc, it's probably protected from converting. Video Converter for Mac is created to convert video files without encryption. In such case, you're recommended to use iSkysoft iMedia Converter for Mac or iSkysoft iMedia Converter Deluxe for Mac which can convert common VOB files and DVD VOB files.
-
9. Failed to load iTunes files, why?
Our Mac applications don't support DRM-protected iTunes M4V files currently. That's the reason why the video can't be imported. iTunes uses Apple's DRM technology protect digital content (mainly purchased video) from using on other computers and devices.
If you have a Windows PC, you can use our Windows software to convert DRM protected video files.
-
10. What are the limitations of the trial version for video/DVD converting tools?
The trial and registered versions of Video Converter are functionally the same product. Below are the limitations of the trial version.
1. There is a watermark (namely Logo) added to the output video file;
2. There is 3 min time limit for the output audio file.After purchasing, you will receive a registration code. Once you register the product, you can immediately get the full version without such limitation.
Note: the converted files before you register will still have watermark remaining on it. The previous watermark will not be removed automatically after you register; you need to convert them again.
-
11. Can I customize output parameters manually, such as frame rate, bit rate or resolution?
Actually, after you choose a format to convert the file, the program will use the default parameters that is the most fitable for this output format to convert the file.
However, if you still want to customize the output parameters, please click the Settings button on the top-right corner of the format to set the frame rate, bit rate or resolution manully.

-
12. How do you improve the quality of converted files?
Two methods are available to improve the quality of converted video files:
1. If the original files are high definition, it's better to choose an HD format as the output format. After the files are imported into the application, go to the Format > HD&3D category to choose an HD format, e.g. HD MOV.

2. If the original files are not high definition, you can try a higher resolution and bit rate in the Settings dialog. However, to keep the original quality, make sure not to set the parameters higher than that of the original one.
Note: If your computer is not fast enough, frame drops might happen, which might cause the video choppy and sometimes only a black screen appears. In such case, it's a good idea to use a lower bit rate.
-
13. What to do if the program fails to load your video files?
If the product fails to import your video files, do the following:
1) Make sure you've installed the application correctly. After downloaded the *.dmg file to your computer, double click it to open the installation wizard. Then drag the application icon and drop it to your Desktop or Applications folder.
2) Make sure the video formats are supported by the application. See the supported formats here: http://www.iskysoft.com/imedia-converter-deluxe-mac/reference.html
3) If the source files can be played with Quicktime Player or VLC Player, you're recommended to re-encode the source files before importing to our applications.
For QuickTime Player: While the video files are playing in Quicktime Player, go to File -> Save As (File -> Export in Mac OS X Lion) in the the top menu bar.
For VLC Media Player: Start VLC, open the video files and then go to the top menu to click File > Streaming / Exporting Wizard... . Select Transcode / Save to file, and follow the instructions to re-encode the file.
If the problem persists, contact us with the your video file included if available. -
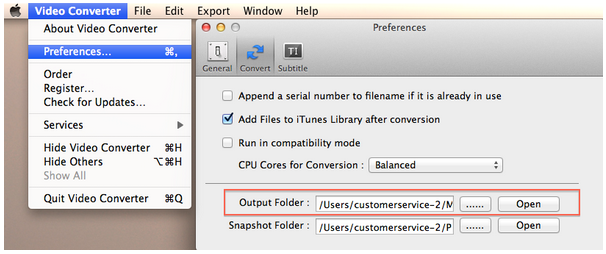
14. Where to find the converted video files?
By default, the converted files are saved to Users/ YOUR HOME FOLDER/Movies on your Mac. You can change it to another folder if you want. Here's how: Open Video Converter for Mac and go to the top Video Converter > Preferences... > Convert, locate the Output Folder option and click Browse (dots) button to select a folder you want.
-
15. How to add a watermark to the files?
There are two ways to get into the Edit interface:
1) Click Edit button on the right side of the video.
2) Click Edit > Watermark from the top menu.

You can add an image watermark. Choose Image Type and browse to find an image on your computer.
Or add a text watermark by choosing Text Type and type words in text box. Click the A button to define font, color, etc. of the text watermark.Adjust position and size of the watermark by dragging the Value sliders of Transparency.
Click None option to delete the watermark before conversion if you do not want to add. The watermark cannot be removed from the result video once the video is converted with the watermark.Tip: Click Apply to All Videos to apply the same effect on all your video files loaded in this product.
-
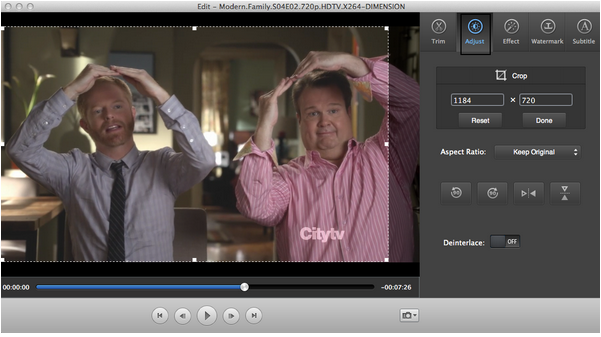
16. How to crop files?
1) Click the Edit button after loading the video file in the product.
2) Go to the top menu bar and click Edit > Cropping.
After clicking the Crop button, there are eight small boxes along the dashed rectangle. Drag the boxes to adjust the rectangle, and the part out of the rectangle is to be eliminated.

The Aspect Ratio list is used to define the size of active portion of output video.
Click Crop button, you can input resolution manually. If you want to remove all the settings, click Reset button. If you complete the settings, click Done button to save themTip: If there are lines in fast moving scenes in videos. You can select Deinterlance.
-
17. How to add subtitles to a video
After loading the video file in this product, please follow either method of the following two:
1) Click the Edit button.2) On the top menu, click Edit > Subtitle.

Switch to the Subtitle tab, and choose Load Subtitle from the Subtitle drop-down list . A new window will show up for you to import a subtitle file from your computer. Either SRT, ASS, or SSA subtitle formats are supported.
Lots of subtitle settings are available. Change subtitle style by options like font, color, size, etc. by clicking the Font option. Select text encoding of the subtitle in Encoding. To adjust the position of subtitles, simply drag slider in Position panel.
Not: If the video file and subtitle file are in the same folder with the same names, the subtitle will be automatically added to the video. -
18. How to import the converted files to iMovie
If you convert video for editing with iMovie, this FAQs is exactly for you. First of all, keep in mind that iMovie only supports these Quicktime-compatible formats: MPEG-4, DV, or .mov.
When the videos are ready, do the following to import files to iMovie:
1. Start iMovie and click File > Import Movies.
2. In the pop-up Finder window, locate the video file you want to load into iMovie.
3. Select Copy Files, (also on the Import dialog box), if you want to keep files in the original folder. Select Move Files, if you want to move the files to the new destination and remove them from its original folder.
4. Click Import. -
19. Why the output videos play fast on Mac?
If all output video and audio files play fast, do this to fix it: go to Apple icon on the top-left corner and choose System Preferences, choose Sound and choose Internal Speakers in Output. Then convert files to try again
If the method doesn't work, contact us for help. Please attach the information below to help us perform troubleshooting:
1. If it's a video file and the size is less than 2GB, upload your original video file to wetransfer ( https://wetransfer.com) and share the link with us for testing purpose. Also, the output settings is helpful for us to find out what's the reason.
2. If it's a DVD, contact us with the DVD details like full name, region code, purchasing link from Amazon, and so on.
-
20. How to capture a snapshot?
Select a file in the program list, click the Preview button (double-click it, or press the SPACE key on keyboard), you can preview it.
In the Preview window, to capture snapshots, just click the Snapshot button at the bottom directly.

-
21. How to capture a video on Mac
Description:
Here we introduce a free video capture application for Mac - FireRecord. It enables you to capture video from your FireWire enabled MPEG2 devices.
What you need is this video capture application, a FireWire cable, and a FireWire equipped box.
Step 1: Install FireRecord and connect your Mac to your set-top box using a Firewire cable. It would automatically detect the set-top box. And you
can check it under Preference > Devices tab.
Device
Step 2: Then you're able to either record an event immediately or schedule an event at a later time. Note that if your set-top box doesn’t
support channel change request, please ensure the current channel is the one you want to record from.
creat a new event
After you define the recording time, you can see them in a table displaying start time, name, duration and channel.
detail table
Step 3: When it comes to the time, the record will start automatically. FireRecord supports 3 video formats: m2t (HDV Video File), ts (Video
Transport Stream) or tp (Beyond TV Transport Stream). The recorded files will be very large, so you need enough space to save the video.
-
22. How do you upload a video to YouTube from iMovie (iMovie 11 included)?
Part 1: How to upload a video to YouTube from iMovie HD (iLife '06)
1. When you're satisfied with your movie, click the Share menu on top.
2. Choose QuickTime from the menu
Select the Quicktime option3. Click Compress movie for and choose Web.
upload videos to youtube from iMovie
4. Store your movie to the desktop or anywhere you want. In the folder it locates, highlight it and then press Command+I on your keyboard to show its information. Make sure the size is smaller than 100 megabytes or it's failed to upload to YouTube.
5. Sing in your YouTube account and click Upload on top of the page.
6. In the open page, click the "Select file to upload" to choose the newly created movie file, or directly drag and drop to the upload area.7. While the video is uploading, you can enter the name, category, tags and any necessary information.
8. It takes a few minutes to upload and process your video before it's published online.Part 2: How to upload a video to YouTube from iMovie (iLife '11)
1. When all editing complete, go to Share > YouTube to open the upload window.

2. Select your YouTube account you've added before or add a new one.
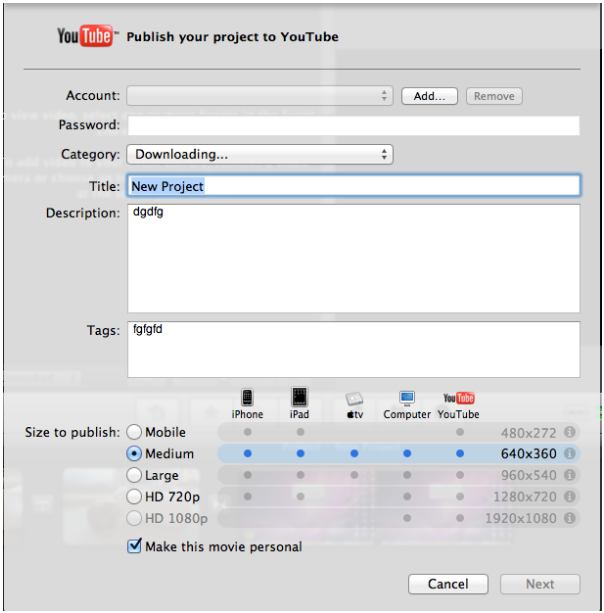
3. Confirm your password.
4. Choose the category, name, description, and tags for your iMovie video.
5. Select the size you want to publish and click Next.
6. Then click the Publish button to start uploading. Your video will be uploaded and processed before it can be watched by others. -
23. How do you convert an iMovie project file?
The iMovie project file is only supported by iMovie itself and the right iMovie version is required. You have to open the iMovie project file and export it as a video file before converting it to the format you want. See below about how to export a video from an iMovie project file.
1. Open iMovie and go to Share > Export Using QuickTime... in the top menu bar. Thie way, you'll get a .MP4 video file.
2. Next, import the MP4 video it to our application to edit it, apply effects and convert it to a format you want.If you don't know how to use it, visit our site for the corresponding guide or go to Help > Online Help on top to open online tutorial of the application.
-
24. Why there is no content in the converted video file?
Check whether the source video file is DRM-protected. The program does not support DRM-protected video files at the time being, like purchased iTunes videos.
If it's a common video without DRM protected, do the following to have a try.
1. Make a new folder on the desktop.
2. At the bottom of the main interface, select the created folder on the desktop as the output folder.If this doesn't work, contact us for further troubleshooting.
